Introduction
To recap,
In my first post, I built a Hyperledger Fabric headless Ubuntu Linux virtual image from official project definition files hosted on Github on my Windows host using Vagrant and Cygwin. I successfully ran the unit and integration tests of the latest version 1.0 (alpha) of the fabric-sdk-java.
In my second post, I installed an XServer on that Hyperledger Fabric virtual image, Eclipse Neon, and was ableto launch the fabric-sdk-java end-to-end integration tests with break points, and step through the code. I also threw in the installation of the IBM WebShere Application Server version 9.
In my third post, I demonstrated how to back up the Hyperledger Fabric virtual image on my desktop and restored it to my laptop along with all the folders synchronized between Windows host and Linux vm.
In my fourth post, I linked to the new much needed “IBM Blockchain For Dummies” PDF.
In my fifth post, I linked to the video and companion PDF of Christian Cachin’s Consensus 2017 presentation “Blockchain, cryptography and concensus” which explains Hyperledger Fabric in clear technical terms.
In my sixth post, I wrote a tutorial demonstrating a gRPC client communicating with a gRPC server through SSL (TLS) on HTTP/2. These programs were coded using protocol buffers in NodeJs, which is server-side JavaScript. These technologies are all used in Hyperledger Fabric.
In this seventh post, I will demonstrate once more a gRPC client communicating with a gRPC server through SSL (TLS) on HTTP/2, but this time it will all be coded in Java using that very same Eclipse Neon IDE I set up in the second post on the Hyperledger virtual machine. To make it really interesting, we will re-use the same protocol buffer message defined for NodeJs as well as the SSL certificates we created earlier. Finally, I will demonstrate my NodeJs gRPC client talking to my Java gRPC server as well as my Java gRPC client talking to my NodeJs gRPC server securely.
Assumptions
- You have read my previous blog posts in order;
- You are not daunted by Java EE, Linux command lines, or Eclipse.
The steps I will describe here could probably be reproduced on any Eclipse Neon Java EE environment.
Concerning the SSL Certifates Generated Using OpenSSL
Do not do the same mistake I did. I have a version of OpenSSL installed on my Windows host (version 0.9.8zf 19 Mar 2015) and another installed on the Hyperledger Fabric Linux VM.
I should warn against “back-and-forthing” between host and vm when generating certificates with OpenSSL. It’s important to run all the OpenSSL commands using the same executable, either on Windows or on the Linux virtual machine. I ran into an issue and wasted an hour or two trying to generate the private key format understood by Java after the fact on my Linux VM. I resolved by going back to the OpenSSL version I had installed on Windows and used in the generation of the NodeJs certificates. Running the same command to generate my key.pem, the Java program suddenly accepted the private key and I was off and running.
Steps We Will Follow
- Launch the Eclipse IDE on the Hyperledger Fabric virtual image
- Re-test the NodeJs gRPC client and gRPC server programs
- Create the Java project in Eclipse Neon
- Generate Java source files from the message.proto file
- Modify the generated Java source files
- Creating the gRPC client, server and service Java source files
- Cleaning and building the Project
- Running the Java gRPC server
- Running the Java gRPC client
- Running the NodeJs gRPC client with the Java gRPC server
- Running the Java gRPC client with the NodeJs gRPC server
Launch the Eclipse IDE on the Hyperledger Fabric virtual image
Open a Cygwin prompt AS AN ADMINISTRATOR.

Launch the Hyperledger Fabric virtual image using the commands:
cd /cygdrive/c/gocode/fabric_java_latest/fabric/devenv
vagrant up
This will open the Virtualbox window. I log in the virtaul machine prompt as user ubuntu, add my password.
I am logged in to Linux in a command prompt. I do the command:
sudo startxfce4&
And my graphical user interface appears:

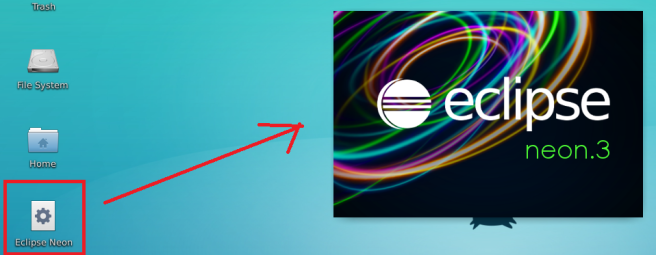
I double-click on the “Eclipse Neon” shortcut on the left side of the pictured desktop. Eclipse Neon starts up.
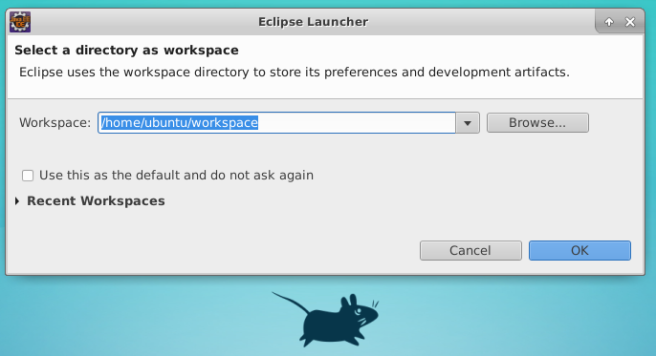
I accept the default workspace:
And I am ready to code Java:

Re-test the NodeJs gRPC client and gRPC server programs
In my previous sixth post, I created a separate headless Linux Ubuntu virtual machine and installed NodeJs, the various gRPC dependencies, as well as created SSL certificates. I did this on a separate image because the Hyperledger Fabric vm already comes with a lot of tools already installed. I wanted to demonstrate bootstrapping.
For this post, however, I copied the NodeJs program and certs to my Hyperledger Fabric image. Let’s test they still work as before.
Back in Cygwin, do the following command to log in to the Hyperledger Fabric image:
vagrant ssh
I could have used a terminal in the graphical interface of the VM, but I admit the weird copy and paste in it drives me nuts. CTRL-SHIFT-V to paste simply does not register in my brain and I’ve forgotten five times how to copy. I am a very patient fellow, but not for long.
So, in Cygwin, I move to the nodecode folder by doing command:
cd devenv/nodecode
On the Linux VM, this shared folder is located at:
/opt/gopath/src/github.com/hyperledger/fabric/devenv/nodecode

On Windows, through the magic provided by Vagrant, I can access the very same folder at:
C:\gocode\fabric_java_latest\fabric\devenv\nodecode

Note the protocol buffers message .proto file, which we will re-use as-is shortly in that the SSL certificates and keys we generated last time are all in the certs subfolder:
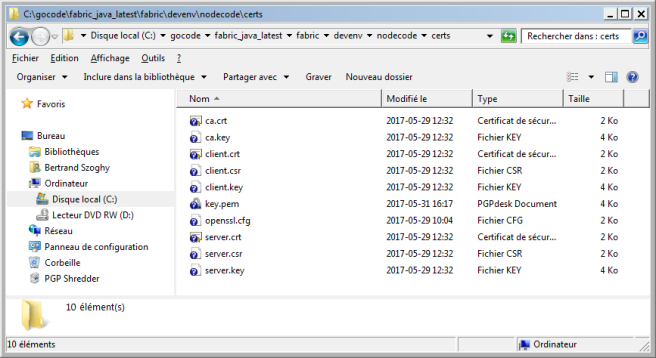
The file key.pem above contains the same private key as server.key, but in a PKCS8 format understood by Java. See my previous post for the OpenSSL commands used to generate these files.
I start the NodeJs gRPC server with the following command (leaving out the .js file extension):
node grpcserver

I leave the server running.
Back in Windows, I open up a second Cygwin prompt AS AN ADMINISTRATOR:
I connect a second time to the Hyperledger Fabric virtual image via SSH using the commands:
cd /cygdrive/c/gocode/fabric_java_latest/fabric/devenv
vagrant ssh
In Linux, I change directory once more to nodecode:
cd devenv/nodecode
And I launch the NodeJs gRPC client with:
node grpcclient
This displays the protocol buffers message sent back by the gRPC server running the service:
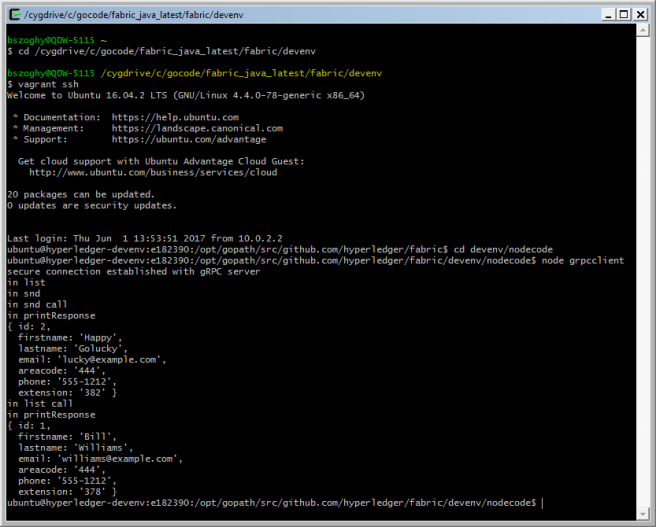
Meanwhile the server indicated in its own prompt that it received the id parameter provided by the client:

OK, all good. Lets go back to Eclipse Neon.
Create the Java project in Eclipse Neon
There are different kinds of Eclipse projects you could attempt here. In reality, there is little choice but to use Mavan. There are two reasons for this.
One, because of the complicated dependencies of a Java project using grpc. In fact, the grpc-java implementation is a standalone Github project that is a bit bleeding edge when it comes to SSL security and the new HTTP/2 binary protocol’s ALPN (application layer protocol negotiation). The short and long of it is that at the time of this writing, the netty-tcnative version 2.0.1.Final approach does not appear to be ready yet. I used the security approach recommended by grpc-java, i.e. using netty-tcnative-boringssl-static version 1.1.33.Fork16.
Two, because Maven will generate Java source files from the message.proto file pretty much magically as opposed to the command-line alternative, which is noticeably more error prone.
For both these reasons, we will create a new Maven project in Eclipse called “JavaGrpc“.
Do menu File > New > Project…
Select Maven Project and click the Next > button:

Change nothing in the next window and click the Next > button:

Change nothing in the next window and click the Next > button:

In the next window we add our project name JavaGrpc to the Artifact Id field and com.wordpress.bertrandszoghy.grpc to the Package name field and click the Finish button:

And that creates our project. Expand the src folder:

We’re going to replace the pom.xml file with the one here (click to download and open in a text editor such as Notepad++):
pom
The pom.xml contains the following dependencies:

It also contains the following plugins. Note that the fix proposed by Volkan Yazici in my second post needs to be applied here as well, i.e. I need to replace the mentions of ${os.detected.classifier} in the pom.xml file with linux-x86_64:

Next we need to ask Maven to pull all these dependencies from the Internet. This is done by right-clicking on the project name “JavaGrpc” in Eclipse > Maven > Update Project… > click the OK button in the dialog that pops up:

That should take a while to finish. The Maven dependencies will be viewable in the tree-view afterwards. There are a few and they need to be just so:

OK, our Java gRPC project is set up.
Generate Java source files from the message.proto file
Once again, I remind you this simple protocol buffers message descriptor file was created as is in my previous post for NodeJs. Not change anything in it will guarantee my Java gRPC client and server programs will easily interoperate with my NodeJs ones.
The message.proto file is simple. You can download from the link below but you will need to rename it from message.proto.doc to message.proto:
message.proto
Here is what it contains:

A reminder protocol buffer syntax is strict. If you decide to re-type the above, don’t forget the curly braces need to be just so.
Maven has a (non-negotiable) convention where .proto files should be placed, i.e. under /src/main/proto
In Eclipse, right click-on main and do New > Folder and name this folder “proto”:

Make sure the new folder is located just so:

Next, create or copy-paste the file message.proto into the folder proto:

We will do two changes here in the message.proto file. We will change the first line to read:
syntax = “proto2”
and we will add a new line to define the package we will use the source files in:

Next, right-click on the “JavaGrpc” project name > Build Project

The Maven Console shows us we have a new generated-sources folder:

Two .java source files have been generated. They are:
- TstServiceGrpc.java
- Message.java

Copy and paste these two .java files into folder:
/src/main/java/com/wordpress/bertrandszoghy/grpc
and delete them from under the generated-sources folder.
You can also go ahead and delete the file:
/src/main/java/com/wordpress/bertrandszoghy/grpc/App.java
which is just a “hello world” generated by Maven.
Next, rename your message.proto to message.proto.txt by right-clicking > Rename…

In the end your folders will look like this:

Modify the generated Java source files
We will do three changes in Message.java.
First, we will change line 125 from:
private TstCoordinates() {
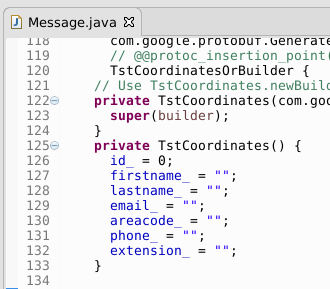
to:
public TstCoordinates() {

Next, we will change line 1546 from:
private TstId() {

to:
public TstId() {

Finally we will change line 2010 from:
private Empty() {
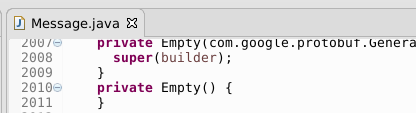
to:
public Empty() {

Next, in TstServiceGrpc.java, we notice there are 4 syntax issues:

These will be fixed by commenting out the annotation @java.lang.Override in four places. You will see in the screen captures the red underlined syntax errors in the “before” screenshots disappearing in the “after” screenshots…
1- We change line 90 from:
@java.lang.Override public final io.grpc.ServerServiceDefinition bindService() {

to two lines, the first commented out:
//@java.lang.Override
public final io.grpc.ServerServiceDefinition bindService() {

2 – We change line 230 from:
@java.lang.Override

to:
//@java.lang.Override

3- We change line 247 from:
@java.lang.Override

to:
//@java.lang.Override
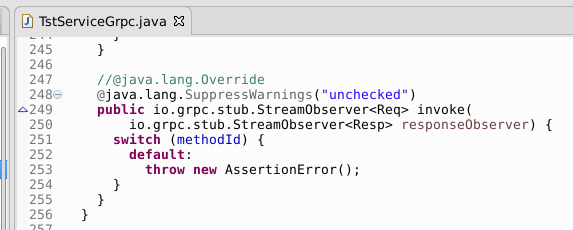
4- We change line 260 from:
@java.lang.Override

to:
//@java.lang.Override

I will do one final change to the file, modifying line 25 from:
private TstServiceGrpc() {}

to
protected TstServiceGrpc() {}

Don’t forget to save these changes.
Creating the gRPC client, server and service Java source files
We will create three new files under the folder /src/main/java/com/wordpress/bertrandszoghy/grpc :
- TstService.java
- TstServiceServer.java
- TstServiceClient
All three will be POJO java files. Here they are for you to download (you will need to rename the file extension from .java.doc to .java):
TstService.java
TstServiceClient.java
TstServiceServer.java
None of these files is very long.
Here is the listing for TstService.java:

Here is the listing for TstServiceServer.java:

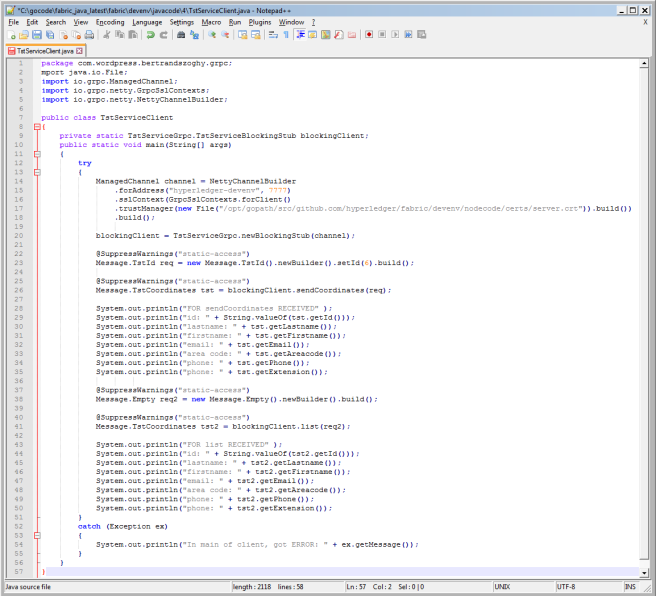
And the longest listing is for TstServiceClient.java because of all the System.out.printlns:
So there you go.
Cleaning and building the Project
Click on the “JavaGrpc” project name, then top menu Project > Clean… > check the “Clean projects selected below” radio button > check the “JavaGrpc” checkbox > click the OK button.

Next, right-click on the “JavaGrpc” project name > Build Project

Expected result is no error in the Problems tab, as illustrated below:

As we old-timers say: “We compile! We ship! Then we test.”
Running the Java gRPC server
First, make sure that NodeJs server is not still running on port 7777 in that Cygwin prompt. If so, do CTRL-C to stop.
Next, in Eclipse, right-click on file TstServiceServer.java > Run As > Java Application
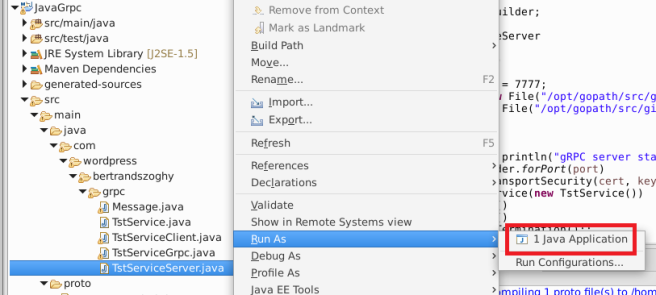
Result we get looks good. The server accepts the certificate and private key for SSL and binds to the service as well as port 7777. There is a somewhat scrary netty warning in red which is a known issue, has already been fixed, but has not been ported to the version I am using. You can safely ignore:

Leave the server running.
Running the Java gRPC client
Next, in Eclipse, right-click on file TstServiceClient.java > Run As > Java Application

The client sends a TstId { ‘id’: 6 } protocol buffer message using the SendCoordinates method over SSL and HTTP/2 to the server which receives it:

The Java gRPC server responds by returning a TstCoordinates message containing id 3, “Jimmy Jazz”.
Then the client send a second “List” method call without a parameter and the server responds by sending back id 4, “Black Jack”.
Here is what it looks like on the client end:

Running the NodeJs gRPC client with the Java gRPC server
I intentionally made it so the NodeJs gRPC server (“Bill Williams” and “Happy Golucky” — see screen capture above) would not return identical data to the Java gRPC server (“Jimmy Jazz” and “Black Jack”).
While our Java gRPC server is still running, let’s go back to the second Cygwin prompt and run the NodeJs gRPC client with command:
node grpcclient
We can see it obtains “Jimmy Jazz” and “Black Jack” back from the Java gRPC server:

Running the Java gRPC client with the NodeJs gRPC server
First, we don’t want the NodeJs server to fail on start because our Java server is hogging port 7777. So in Eclipse we shut down our Java gRPC server by clicking on the red square button:

Next, we return to our first Cygwin prompt and launch our NodeJs gRPC server with command:
node grpcserver
We go back to Eclipse and run the Java gRPC client again by right-clicking on file TstServiceClient.java > Run As > Java Application
Obtained result:

And there you go.
I sure made it look easy, didn’t I ?
(end of post)
Bertrand Szoghy, 2017-06, Quebec City.